上一篇讲了 dsh-superagent 在 GitHub 上的部署,飞书的接入步骤也单独写了一篇(官方步骤在 docs/006 的 Feishu bot 一节)。这篇回答海外团队和用 Lark 的公司最常问的问题:dsh-superagent 能不能接 Lark(飞书国际版,larksuite.com)?
先说结论:能,而且不用改代码。 dsh-superagent 没有单独的 “Lark Source”,Lark 走的就是飞书 Source(dsh-superagent-feishu)。区别只在 lark-cli 的 brand:初始化机器人配置时加上 --brand lark,之后 API 调用、长连接和消息链接都会切到 larksuite.com 的域名。其余步骤和飞书一样,只是开发者后台换成 open.larksuite.com,界面是英文。
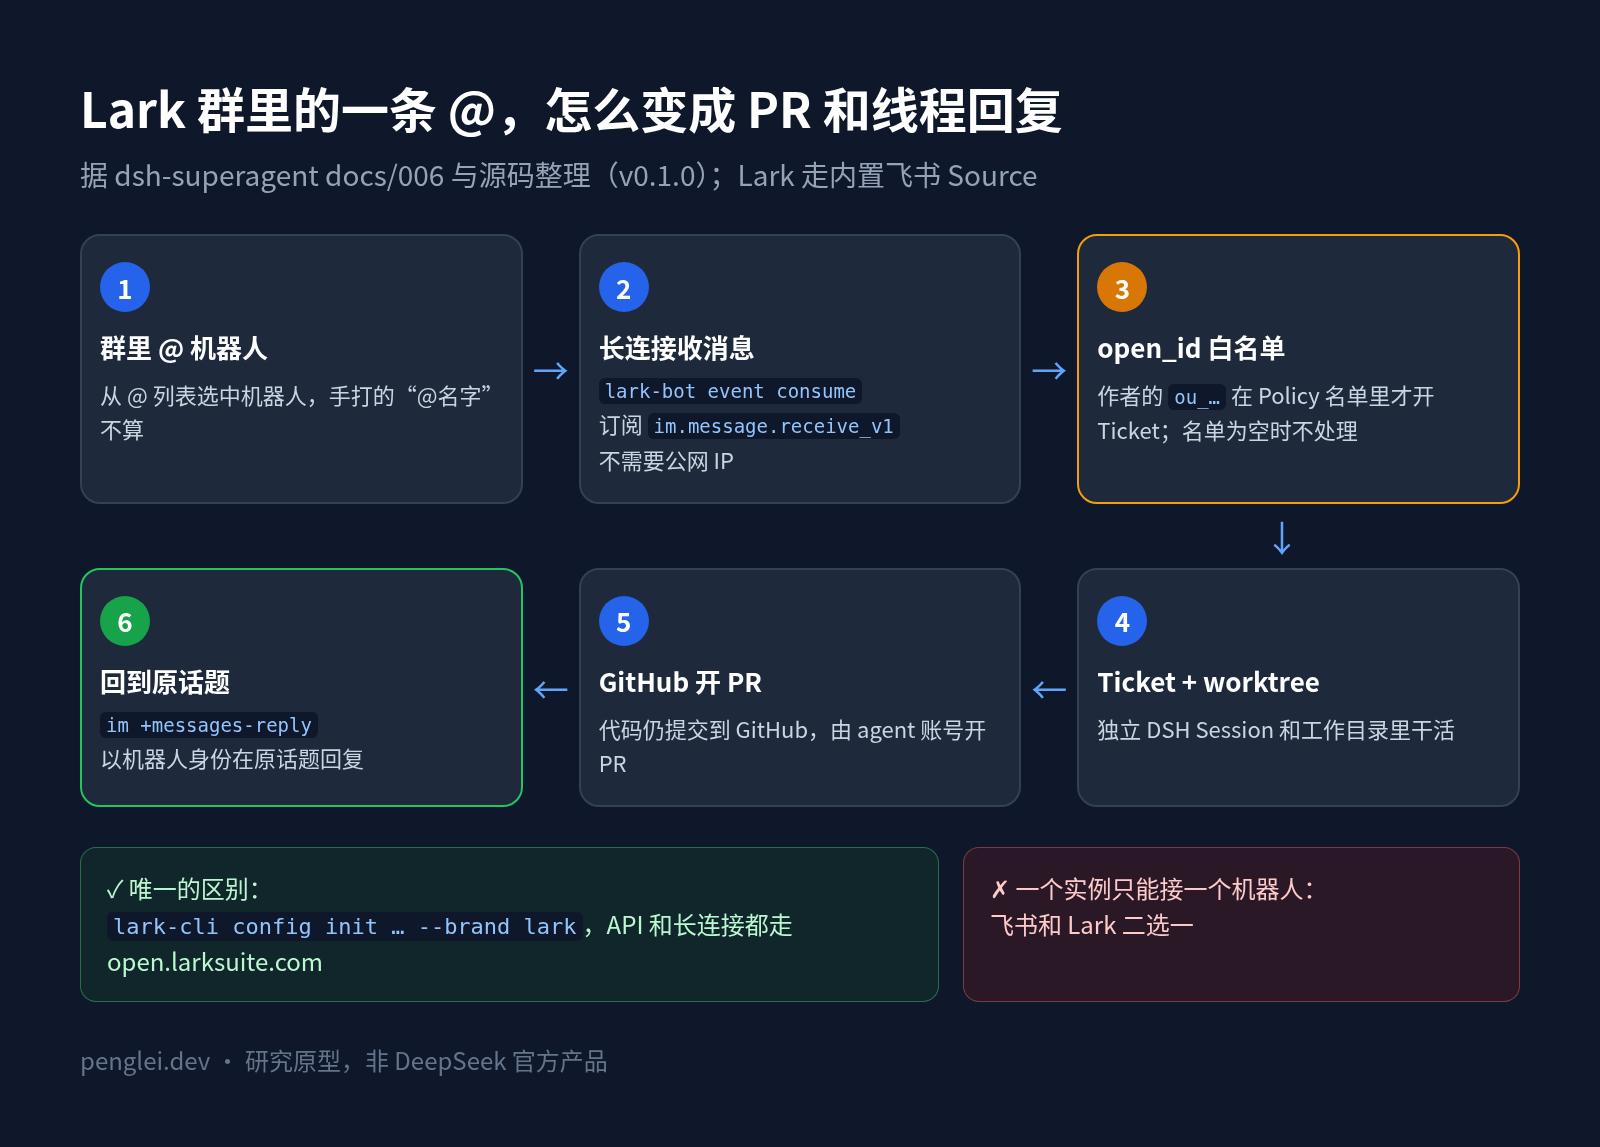
说明:dsh-superagent 的 README 第一句是 “Research prototype for reference only, not an official DeepSeek product.”,也就是研究原型,不是 DeepSeek 的官方产品。本文的结论来自该仓库的 docs/006 和源码(
src/deployment.ts、src/sources/feishu-channel.ts、tests/deployment.spec.ts)、lark-cli 源码,以及 Lark 开放平台文档(2026-11-03 查阅,dsh-superagent 版本 0.1.0)。我没有在 Lark 租户里完整跑过这一套,文中没有实测数据。
English quick summary
- Is Lark supported? Yes, through the built-in Feishu Source. dsh-superagent reads the
brand(feishuorlark) fromlark-cli auth status, and lark-cli then sends every API call and the event WebSocket toopen.larksuite.com. - What changes from Feishu: create a Custom App with the Bot feature at
open.larksuite.com/app, then runlark-cli config init --app-id <cli_…> --app-secret-stdin --brand lark. - What stays the same: the bot-only (
strict-mode bot) lark-cli wrapper, the persistent-connection subscription toim.message.receive_v1, thedsh-superagent-feishuplugin entry, and the allowlist ofopen_ids (ou_…). - Limitation: one dsh-superagent instance holds one bot configuration, so it uses either Feishu or Lark, not both.
- Caveat: this is a research prototype, not an official DeepSeek product. Run it under a dedicated OS user.
一、dsh-superagent 支持 Lark 吗:源码里的 brand 处理
README 和面板文案里只写了“飞书 / Feishu”,所以很多人以为它不支持 Lark。把文档和源码对一遍,结论是支持:
| 环节 | 源码 / 文档里的写法 | 对 Lark 意味着什么 |
|---|---|---|
| 前置条件 | docs/006:“lark-cli (tested with 1.0.90) and a Feishu or Lark app with a bot” |
官方文档明确把 Lark 应用列为可用 |
| 读取机器人配置 | docs/006:“It reads the app id, Feishu/Lark brand and bot open_id from the bot configuration.” src/deployment.ts 里解析 lark-cli auth status 的 brand 字段,取值 feishu 或 lark,缺省为 feishu |
brand 不需要在 dsh-superagent 里配,它跟着 lark-cli 走 |
| 消息链接 | src/sources/feishu-channel.ts:brand 为 lark 时,用 https://applink.larksuite.com/client/chat/open?... 生成会话链接 |
面板和回复里的链接会打开 Lark 客户端 |
| API 调用和长连接 | dsh-superagent 所有飞书操作都通过 lark-cli 完成(event consume、im +messages-reply、api GET /open-apis/...);lark-cli 的 ResolveEndpoints 把 brand lark 解析成 https://open.larksuite.com,event consume 的长连接也用这个域名 |
域名切换由 lark-cli 负责,dsh-superagent 不硬编码 feishu.cn |
| 测试 | tests/deployment.spec.ts 用 brand: 'lark' 的 auth status 做测试,期望解析出 brand: 'lark' |
至少有单元测试覆盖,但没有官方的端到端 Lark 教程 |
还有一个从源码看出来的限制:部署信息里的 feishu 是单个对象,包括 cli、appId、brand、botId 和 name。所以一个 dsh-superagent 实例只能接一个机器人,要么飞书,要么 Lark。团队两边都用的话,就得跑两个实例,比如用两个 DSH profile。这个做法是我根据源码推断的,官方没有写。
二、Lark 和飞书的差异速查
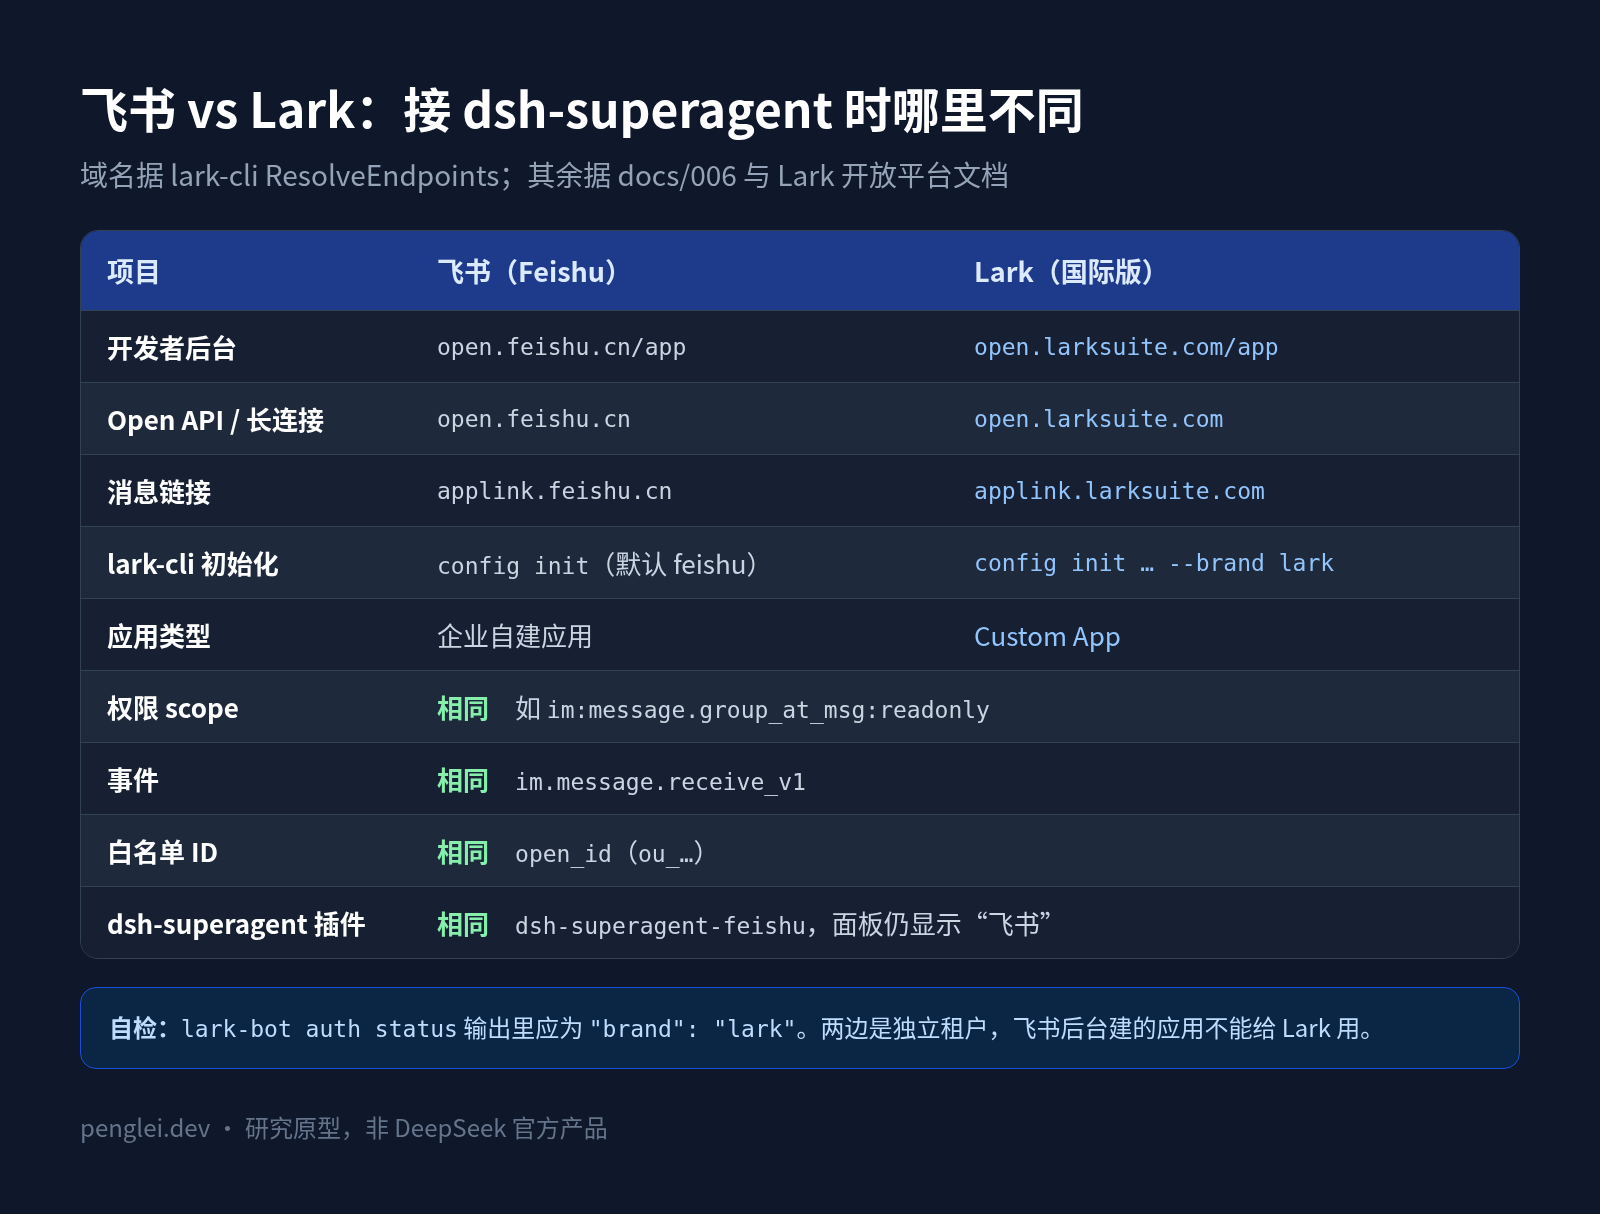
| 项目 | 飞书(Feishu) | Lark(国际版) |
|---|---|---|
| 开发者后台 | open.feishu.cn/app | open.larksuite.com/app |
| Open API 域名(lark-cli 解析) | https://open.feishu.cn |
https://open.larksuite.com |
| 账号域名 | accounts.feishu.cn |
accounts.larksuite.com |
| 消息/会话链接 | applink.feishu.cn |
applink.larksuite.com |
| lark-cli 初始化 | config init(--brand 默认 feishu) |
config init ... --brand lark |
| 应用类型 | 企业自建应用 | Custom App(也就是自建应用) |
| 权限名(scope) | im:message.group_at_msg:readonly 等 |
相同(Lark 文档里的 scope 标识一样) |
| 事件 | im.message.receive_v1 |
相同 |
| 用户 ID | open_id(ou_…) |
相同格式 |
飞书和 Lark 是两套独立的租户和开放平台:在飞书后台建的应用不能给 Lark 租户用,反过来也一样。域名一栏来自 lark-cli 源码 internal/core/types.go 里的 ResolveEndpoints。
三、前置条件
| 项目 | 要求 | 来源 |
|---|---|---|
| GitHub 部分 | 已按 GitHub 部署指南 装好 DSH、superagent profile 和 agent GitHub 账号 |
docs/006 |
| lark-cli | 文档测试版本 1.0.90;config init 支持 --brand 参数 |
docs/006、lark-cli cmd/config/init.go |
| Lark 应用 | 一个 Custom App,开启 Bot,权限和事件配好,并发布版本 | docs/006、Lark 开放平台 |
| 网络 | 运行 dsh-superagent 的机器能访问 open.larksuite.com;长连接不需要公网 IP |
Lark 长连接文档 |
lark-cli 的安装方式(lark-cli README):
npx @larksuite/cli@latest installDSH 版本照旧按 dsh-superagent 的 engines.dsh(^0.2.1-alpha.2)来装,文档固定的是 0.2.1-rc.3。不要为了接 Lark 去升级 DSH 的 alpha 版本。
四、第 1 步:在 Lark Developer Console 创建 Custom App 和 Bot
docs/006 只有一句话:创建一个带机器人能力的自建应用,授予接收消息事件、读取和发送群消息、读取群成员的权限,然后发布版本。放到 Lark 后台,对应的操作是(菜单名取自 Lark 开放平台文档,界面可能随版本略有不同):
- 打开 Lark Developer Console,Create Custom App。
- 进入应用,在 Features → Add Features 里添加 Bot。
- 在 Credentials & Basic Info 里记下 App ID(形如
cli_…)和 App Secret。
一定要用 Custom App。Lark 文档写明:persistent connection(长连接)模式只支持企业自建应用,商店应用不行,而 dsh-superagent 正是用长连接收消息。
五、第 2 步:开通权限(Permissions & Scopes)
Lark 和飞书的 scope 标识是一样的。下面这张表是我按 dsh-superagent 实际调用的 lark-cli 命令反推的,不是官方清单:
| 用途 | dsh-superagent 调用 | 权限 |
|---|---|---|
| 收群里 @ 机器人的消息 | event consume im.message.receive_v1 |
im:message.group_at_msg:readonly |
| 收私聊(lark-cli 订阅该事件时会检查) | 同上 | im:message.p2p_msg:readonly |
| 读消息、话题上下文 | im +messages-mget、im +threads-messages-list |
im:message:readonly |
| 以机器人身份回复 | im +messages-reply |
im:message:send_as_bot |
| 列出机器人所在的群 | im +chat-list |
im:chat:read |
| 读群成员(同步白名单) | im +chat-members-list |
im:chat.members:read |
“全部消息”模式还需要敏感权限 im:message.group_msg。只用“仅 @”的话就不要申请。
注:这张 scope 表是从源码调用反推的。Lark 后台可能显示英文名称(例如 “Read group chat messages mentioning the bot”),可以按 scope 标识搜索。lark-cli 缺权限时会在报错里给出
missing_scopes和一个指向 Lark 后台的console_url(lark-cli 源码里这个链接按 brand 生成)。
六、第 3 步:事件订阅,用 persistent connection
- 进入 Events & Callbacks → Event Configuration,订阅方式选 Receive events through persistent connection。
- 添加事件
im.message.receive_v1(接收消息,在 Messenger 分类下)。
Lark 文档有两条要注意:
- 保存长连接订阅方式时,需要有一个客户端在线,否则保存不了。
- 长连接是集群模式:同一个应用有多个客户端在线时,每条消息只会随机推给其中一个。所以不要让同一个 Lark 应用同时被另一个程序消费。
保存时让客户端在线,可以在配置好下一步的 lark-bot 之后,临时跑一次 lark-cli 的事件消费命令,比如 lark-bot event consume im.message.receive_v1 --as bot。这个顺序是我根据两份文档推出来的,没有实际操作过。
七、第 4 步:lark-cli 用 --brand lark 建一份只允许机器人身份的配置
这是和飞书唯一不同的一行命令。docs/006 原有的命令加上 --brand lark:
LARKSUITE_CLI_CONFIG_DIR="$HOME/.lark-cli-dsh-superagent" lark-cli config init --app-id <cli_…> --app-secret-stdin --brand lark
LARKSUITE_CLI_CONFIG_DIR="$HOME/.lark-cli-dsh-superagent" lark-cli config strict-mode bot --global
cat > ~/.local/bin/lark-bot <<'EOF'
#!/bin/sh
export LARKSUITE_CLI_CONFIG_DIR="$HOME/.lark-cli-dsh-superagent"
exec lark-cli "$@"
EOF
chmod +x ~/.local/bin/lark-bot--brand:lark-cli 源码里的说明是 “feishu or lark (non-interactive, default feishu)”。不加就是飞书。--app-secret-stdin:从标准输入读 App Secret,lark-cli 的说明是 “avoid process list exposure”,避免 secret 出现在进程列表里。strict-mode bot:锁成只允许机器人身份。dsh-superagent 会检查这一点:能以用户身份执行的 CLI 直接拒绝(docs/006:“The host refuses a CLI that can act as a user.”)。- 单独的
LARKSUITE_CLI_CONFIG_DIR:lark-cli 一个 app id 只能有一份 profile,你个人的配置里可能已经用同一个应用登录过用户身份。
自检:确认 brand 是 lark
lark-bot auth status
lark-bot im +chat-list
auth status 输出的 JSON 里应该有 "brand": "lark",dsh-superagent 读的就是这个字段。如果显示 feishu,说明初始化时没加 --brand lark。
brand 配错了想重来,按 docs/006 的提醒:直接删掉 ~/.lark-cli-dsh-superagent 目录再初始化,不要跑 lark-cli config remove,因为两份配置共用钥匙串里同一条 App Secret。
八、第 5 步:把机器人拉进 Lark 群
在 Lark 客户端进入目标群,在群设置里添加你的应用机器人。如果搜不到,先检查 Availability(可用范围)里有没有当前用户,并确认版本已经发布。
机器人不在群里时,dsh-superagent 会报 The Feishu bot is not a member of the chat.。Lark 下也是这个文案,因为报错是按错误码 232011 改写的,不区分 brand。按 docs/006 的说法,把机器人加进群后,下一次尝试就会成功。
九、第 6 步:在 dsh-superagent 里启用飞书 Source
Lark 用的是同一个插件。编辑 ~/.dsh/profiles/superagent/cordis.patch.yml:
- id: dsh-superagent-feishu
  disabled: false
然后重启:
scripts/dsh-superagent restart
scripts/dsh-superagent status
在面板 Sources 的飞书卡片里填 lark-bot 的绝对路径、选接收的群(先用“仅 @”)、“其他群”保持“不接收”。用 Management API 的话,块名同样是 source:feishu:
{"enabled": true, "config": {"cli": "/home/me/.local/bin/lark-bot",
  "chats": [{"chatId": "oc_…", "name": "dev-team", "listen": "mentions"}],
  "directMessages": true, "otherChats": "none"}}
面板上的名字还是“飞书 / Feishu”,这是正常的。保存时 dsh-superagent 会重新读取应用和机器人信息,brand 也在这一步读到。
十、第 7 步:Policy 白名单(open_id)
和飞书一样:白名单为空时,任何请求都不会变成 Ticket。 在 Policy 的 On each Source 里,飞书这一栏填 open_id(ou_…)。可以用机器人身份列出群成员来查:
lark-bot im +chat-members-list --chat-id oc_xxx --member-types user“同步来源群”会让群里所有人都能让 agent 开 PR,只适合成员可控的小群。海外团队的群里外部成员通常更多,建议手工填名单。
十一、排错表
前 5 行来自 docs/006 和源码;后 4 行是我按源码和文档推断的,标了“推断”。
| 现象 / 报错 | 原因和处理 |
|---|---|
The bot lark-cli allows user identities |
指向的 lark-cli 能以用户身份执行。按第七节单独建一份 strict-mode bot 配置 |
The bot lark-cli does not work. / The bot identity of app … is … |
检查这份配置的 App ID 和 App Secret |
The Feishu bot is not a member of the chat. |
Lark 下文案相同。在群设置里加机器人,下一次尝试就会成功 |
status 退出码 2,errors 里有 feishu 或 sync:<source id> |
飞书 Source 或白名单同步出错,重启解决不了,按 errors 详情处理 |
| @ 了没反应 | 作者不在白名单(填的是 open_id);Source 没开;处理被暂停;群没在“接收的群”里 |
| 面板里的消息链接打开的是飞书(推断) | auth status 里的 brand 不是 lark,删掉配置目录,加 --brand lark 重新初始化,然后在面板里 Check again 或重启 |
config init 时凭据校验失败(推断) |
lark-cli 初始化时会用 brand 对应的域名换取 tenant token。用 Lark 的 App ID 却按飞书初始化(或反过来),校验会失败 |
| 后台保存 persistent connection 失败(推断) | Lark 要求保存时有长连接客户端在线 |
| 偶尔收不到消息(推断) | 同一个应用有多个长连接客户端在线,消息被别的客户端收走了 |
另外,docs/006 写明:setup 没能检查飞书机器人时,status 仍算正常;飞书 setup 失败只会关掉飞书 Source。所以 status 是 0 也要去面板看一眼飞书 Source 的状态。
还有一个社区反馈:手动打出来的“@名字”文字不算 @ 机器人,要从 @ 列表里选中机器人(见 @NpieAI 的实操帖,飞书场景)。Lark 是同一套消息结构,应该一样,但我没有验证。
十二、安全注意事项
- 群消息是输入,不是授权。 docs/002 和仓库里的
dsh-superagent-feishuskill 都写明:其他参与者、机器人和引用的指令 “never authorize work”。但 worker 读到的文字仍可能被模型当成指令,和 AGENTS.md 投毒 是同一类风险。白名单越小越好。 - 只给机器人身份,只开需要的权限。 不开“全部消息”就不要申请
im:message.group_msg。 - 隔离照旧。 worker 以
danger-full-access运行在你的系统用户下,能读 home 目录。建议用单独的 OS 用户或 VM,把你个人登录过用户身份的lark-cli加进 Execution 的 blocked commands,auto-merge 先关。 - 外部成员。 Lark 群里常有其他公司的人。不要用“同步来源群”,也别把机器人拉进有外部成员的群。
十三、怎么选
| 情况 | 建议 |
|---|---|
| 团队用 Lark 国际版 | 按本文配置,--brand lark |
| 团队用飞书 | 步骤基本相同,config init 不加 --brand(默认飞书),后台用 open.feishu.cn;完整步骤见 dsh-superagent 接入飞书机器人教程,官方步骤见 docs/006 |
| 两边都用 | 一个实例只能接一个机器人,需要两套部署(推断) |
| 团队在 Slack / Linear | 官方没有这两个 Source,需要按 Cookbook 自己写 |
| 只在 GitHub Issue 里协作 | 只用 GitHub Source 就够了 |
最后
Lark 支持在 dsh-superagent 里藏得比较深:README 不提,面板写的是“飞书”,但 docs/006 写了 “Feishu or Lark app”,源码也按 lark-cli 报告的 brand 处理域名和链接。实际要做的只有两件事:后台换成 open.larksuite.com,config init 加上 --brand lark。
一句话:dsh-superagent 接 Lark 用的是飞书 Source,lark-cli 初始化加 --brand lark,用 auth status 确认 brand 是 lark,再用 strict-mode bot 和 open_id 白名单把门守住。
还没装 DSH 的话,先看 dsh-superagent GitHub 部署指南。想了解 DSH 配 DeepSeek 模型的实际体验,可以看 DeepSeek V4.1 Flash 接进 OMP 和 DSH。关心 agent 的模型账单,可以看 DeepSeek V4.1 Flash 1017 接入 Claude Code:配置与价格。
参考来源
- dsh-superagent-prototype 仓库与 README:https://github.com/deepseek-ai/dsh-superagent-prototype
- 部署文档 docs/006-deployment.md(Prerequisites、Feishu bot、Troubleshooting):https://github.com/deepseek-ai/dsh-superagent-prototype/blob/main/docs/006-deployment.md
- brand 解析 src/deployment.ts(
resolveFeishuBot、AuthStatus):https://github.com/deepseek-ai/dsh-superagent-prototype/blob/main/src/deployment.ts - 链接生成 src/sources/feishu-channel.ts(
feishuChatLink):https://github.com/deepseek-ai/dsh-superagent-prototype/blob/main/src/sources/feishu-channel.ts - 测试 tests/deployment.spec.ts(
brand: 'lark'):https://github.com/deepseek-ai/dsh-superagent-prototype/blob/main/tests/deployment.spec.ts - 授权文档 docs/002-authorization.md:https://github.com/deepseek-ai/dsh-superagent-prototype/blob/main/docs/002-authorization.md
- lark-cli 仓库与 README:https://github.com/larksuite/cli
- lark-cli
config init的--brand参数(cmd/config/init.go):https://github.com/larksuite/cli/blob/main/cmd/config/init.go - lark-cli 域名解析
ResolveEndpoints(internal/core/types.go):https://github.com/larksuite/cli/blob/main/internal/core/types.go - lark-cli
auth status输出 brand(cmd/auth/status.go):https://github.com/larksuite/cli/blob/main/cmd/auth/status.go - Lark 开放平台 · Receive events through persistent connection:https://open.larksuite.com/document/ukTMukTMukTM/uYDNxYjL2QTM24iN0EjN/event-subscription-configure-/use-websocket
- Lark 开放平台 · Receive message 事件(im.message.receive_v1):https://open.larksuite.com/document/server-docs/im-v1/message/events/receive
- Lark 开放平台 · Custom app development process:https://open.larksuite.com/document/home/introduction-to-custom-app-development/self-built-application-development-process
- 社区实操帖(@NpieAI,2026-11-02):https://x.com/NpieAI/status/2117204182104969465
相关阅读:
Comments