This is the first article in a 14-day series. We are not writing much code yet. Instead, we are drawing the map first: when we talk about coding agent products such as Cursor, Codex, and Claude Code, are we talking about the model, the agent, or the harness around the model?
After reading this article, you should be able to separate three things:
- What model APIs from OpenAI and Anthropic actually provide.
- What an agent loop adds on top of ordinary chat and tool calling.
- What engineering responsibilities a coding agent harness must own.
Over the next 13 days, we will gradually turn the modules in this article into code.
What Problem Are We Solving Today?
From the outside, products like Cursor, Codex, and Claude Code are easy to describe as “a model that is better at writing code.” But the capability of these products is often determined less by the model itself and more by the system around the model.
That system is what this article calls an Agent Harness.
It answers questions like:
- How does a one-sentence user task become context that the model can understand?
- When the model wants to read files, search code, run tests, or modify files, who actually executes those actions?
- Can the model directly delete files, access the network, or run shell commands?
- How is intermediate state preserved during a multi-step task?
- When the context grows too large, what should be kept, summarized, or dropped?
- When something goes wrong, how can a developer know which step failed?
These questions are not solved by the model alone. They are solved by different modules inside the harness:
| Question | Responsible module | What the first phase will implement |
|---|---|---|
| How does a user task become model context? | Context Builder | Assemble system prompt, user request, tool definitions, project rules, and relevant file snippets |
| Who executes file reads, code search, tests, and edits? | Tool Runtime | Dispatch model tool calls to local functions, shell commands, or a patch executor |
| Can the model delete files, access the network, or run shell? | Safety Layer | Restrict workspace scope and require approval for file writes and command execution |
| How is intermediate state preserved? | Agent Loop + Transcript | Save model outputs, tool calls, tool results, and final task state |
| What happens when context grows too large? | Context Builder | Start with structured context parts and token estimates, then later add retrieval and compression |
| How do we debug a failed run? | Transcript | Record key events as JSONL so an agent run can be inspected and replayed |
So on Day 01, we are not rushing into implementation. We are clarifying the boundaries first: what is the model, what is the agent, and what is the harness? Each following day will turn one piece of this map into code.
Common Interface Shapes
Modern LLM products and agent products usually expose several kinds of interfaces. They may all look like “calling a model,” but they sit at different abstraction levels.
1. Chat Interface
The simplest interface is chat. The caller sends input, and the model returns an assistant response.
With the OpenAI Responses API, the shape looks roughly like this:
import OpenAI from "openai";

const client = new OpenAI();

const response = await client.responses.create({
  model: "gpt-5.5",
  instructions: "You are a concise coding assistant.",
  input: "Explain what this repository does.",
});

console.log(response.output_text);
This interface works well for Q&A, explanation, summarization, and text generation. Its key property is: the model only generates the next response.
If you ask:
Explain this function.The model itself does not know where “this function” lives. Unless the caller has already placed the code in the context, the model cannot read your filesystem.
The Anthropic Messages API has the same boundary, just with a different field shape:
import Anthropic from "@anthropic-ai/sdk";

const client = new Anthropic();

const message = await client.messages.create({
  model: "claude-opus-4-8",
  max_tokens: 1024,
  system: "You are a concise coding assistant.",
  messages: [
    {
      role: "user",
      content: "Explain what this repository does.",
    },
  ],
});

console.log(message.content);
Whether we call the field input in OpenAI or messages in Anthropic, this is still text in and text out. There is no tool execution and no access to the local codebase.
2. Tool Calling Interface
The next layer is tool calling. The model can return not only natural language, but also a structured action.
In the OpenAI Responses API, tool definitions are passed through the tools parameter. Here is a realistic read_file tool definition:
const response = await client.responses.create({
  model: "gpt-5.5",
  input: "Read README.md and summarize it.",
  tools: [
    {
      type: "function",
      name: "read_file",
      description: "Read a UTF-8 text file from the current workspace.",
      parameters: {
        type: "object",
        properties: {
          path: {
            type: "string",
            description: "Workspace-relative file path, for example README.md",
          },
        },
        required: ["path"],
        additionalProperties: false,
      },
    },
  ],
});
If the model decides to use the tool, the response will include an output item similar to function_call. Your program must find that output item, read its name, call_id, and arguments, and then execute the corresponding function. After execution, it sends the result back to the model as function_call_output:
const toolResult = await readFileFromWorkspace("README.md");

const finalResponse = await client.responses.create({
  model: "gpt-5.5",
  input: [
    { role: "user", content: "Read README.md and summarize it." },
    ...response.output,
    {
      type: "function_call_output",
      call_id: "call_abc123",
      output: toolResult,
    },
  ],
  tools: [
    {
      type: "function",
      name: "read_file",
      description: "Read a UTF-8 text file from the current workspace.",
      parameters: {
        type: "object",
        properties: {
          path: { type: "string" },
        },
        required: ["path"],
        additionalProperties: false,
      },
    },
  ],
});
Anthropic also passes tool definitions at the top level of the request, but the schema field is named input_schema:
const message = await client.messages.create({
  model: "claude-opus-4-8",
  max_tokens: 1024,
  tools: [
    {
      name: "read_file",
      description: "Read a UTF-8 text file from the current workspace.",
      input_schema: {
        type: "object",
        properties: {
          path: {
            type: "string",
            description: "Workspace-relative file path, for example README.md",
          },
        },
        required: ["path"],
      },
    },
  ],
  messages: [
    {
      role: "user",
      content: "Read README.md and summarize it.",
    },
  ],
});
If Claude decides to call a tool, the assistant message’s content contains a tool_use block:
{
  "role": "assistant",
  "content": [
    {
      "type": "tool_use",
      "id": "toolu_01...",
      "name": "read_file",
      "input": {
        "path": "README.md"
      }
    }
  ]
}
After your program executes the tool, it sends the result back as a tool_result:
const nextMessage = await client.messages.create({
  model: "claude-opus-4-8",
  max_tokens: 1024,
  tools,
  messages: [
    {
      role: "user",
      content: "Read README.md and summarize it.",
    },
    {
      role: "assistant",
      content: message.content,
    },
    {
      role: "user",
      content: [
        {
          type: "tool_result",
          tool_use_id: "toolu_01...",
          content: toolResult,
        },
      ],
    },
  ],
});
The important point is this: the model only emits function_call or tool_use. The model did not actually read the file. The external program did. That external program is the harness.
This boundary matters:
Model decides what tool to call.
Harness executes the tool.
Model observes the result.
The model selects the action. The harness performs the action.
3. Agent Loop Interface
When tool calling happens more than once, we get an agent loop.
In the OpenAI Responses API, this usually means maintaining an input array. On each round, you append the previous response.output and tool results, then call client.responses.create(...) again.
const input = [{ role: "user" as const, content: "Fix the failing test." }];

for (let step = 0; step < 8; step += 1) {
  const response = await client.responses.create({
    model: "gpt-5.5",
    input,
    tools,
  });

  input.push(...response.output);

  const functionCalls = response.output.filter(
    (item) => item.type === "function_call",
  );

  if (functionCalls.length === 0) {
    break;
  }

  for (const call of functionCalls) {
    const output = await runTool(call.name, call.arguments);
    input.push({
      type: "function_call_output",
      call_id: call.call_id,
      output,
    });
  }
}
In the Anthropic Messages API, the same loop revolves around tool_use and tool_result blocks:
const messages = [
  {
    role: "user" as const,
    content: "Fix the failing test.",
  },
];

for (let step = 0; step < 8; step += 1) {
  const message = await client.messages.create({
    model: "claude-opus-4-8",
    max_tokens: 4096,
    tools,
    messages,
  });

  messages.push({
    role: "assistant",
    content: message.content,
  });

  const toolUses = message.content.filter((block) => block.type === "tool_use");

  if (toolUses.length === 0) {
    break;
  }

  messages.push({
    role: "user",
    content: await Promise.all(
      toolUses.map(async (toolUse) => ({
        type: "tool_result",
        tool_use_id: toolUse.id,
        content: await runTool(toolUse.name, toolUse.input),
      })),
    ),
  });
}
For example, a coding agent fixing a bug might go through these steps:
- Read the error log
- Search for the related function
- Read the implementation file
- Modify the code
- Run tests
- Continue fixing based on test output
- Produce the final summary
At this point, the product is no longer “one model call.” It needs a loop controller: when to continue, when to stop, and how to recover after failure. This is the core of the harness.
In other words, OpenAI or Anthropic provides the model API and the tool-calling protocol. Your harness turns those protocols into a reliable engineering execution loop.
4. IDE / CLI / App Interface
The outermost layer is the product surface that users actually touch.
CLI:        codex "fix this bug"
IDE:        side panel chat + inline diff
Desktop:    task thread + browser + file preview
Cloud:      background task + PR + review
These surfaces feel very different, but they share the same underlying questions: where does context come from, how do tools run, how are permissions enforced, and how are results shown?
This series starts with a CLI not because a CLI is the most complete product surface, but because a CLI exposes the essence of the harness with the least UI noise.
The Boundary Between Model, Agent, and Harness
We can look at the system in three layers:
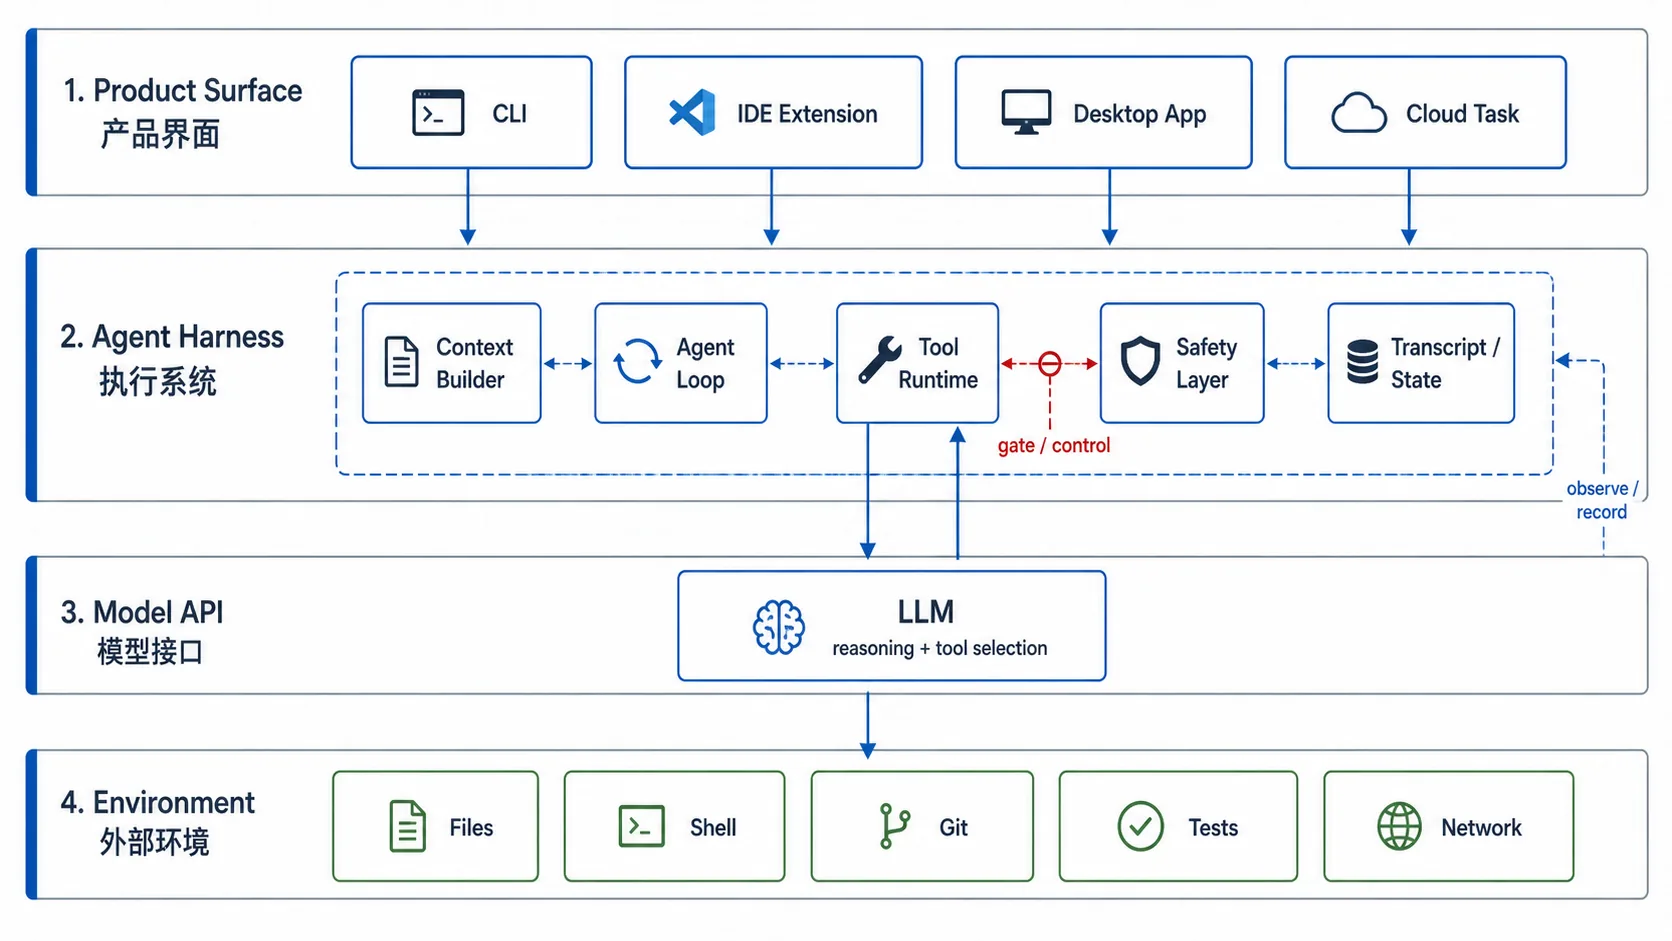
In this diagram, the model sits at the bottom as the Model API. It generates responses, reasons about next steps, and chooses tools. It does not directly read or write your filesystem.
The middle Agent Harness layer is where most product capability comes from. It turns the user task into context, maintains the multi-step loop, executes tools, checks permissions, and records the process.
The top Product Surface is what the user sees: CLI, IDE extension, desktop app, or cloud task. The experience varies, but the underlying harness problems are similar.
More concretely:
| Layer | It owns | It does not own |
|---|---|---|
| Model | Generating responses, reasoning, choosing tools | Real file writes, command execution, permission safety |
| Agent | Multi-step task decisions | Breaking system limits or bypassing approval |
| Harness | Tool execution, context management, state persistence, permission control | Replacing model reasoning |
A common misunderstanding is that an agent is a built-in property of the model.
A more accurate statement is: agent behavior is produced by combining model capability with an external execution system.
The model can express the intention “I want to read a file,” but without a read_file tool provided by the harness, it cannot read the file. The model can propose “I should run tests,” but without shell execution in the harness, it cannot run tests. The model can produce a patch, but without a harness applying the diff, the repository does not change.
This is why the same model can feel completely different in ordinary chat, an IDE extension, a CLI agent, or a cloud task. The difference comes from the harness.
What Does a Coding Agent Harness Need?
In this series, we will first split the harness into six foundational modules.
CLI
The CLI is the first product surface. It accepts tasks, parses arguments, and prints results.
npm run dev -- "explain this repo"
npm run dev -- --context-report "read package structure"
Context Builder
The Context Builder decides what the model can see.
It assembles:
- system prompt
- current user task
- conversation history
- tool definitions
- project rules
- relevant file snippets
- previous tool results
This is a key capability in a coding agent. Good context makes the model look smart. Bad context makes it get lost.
Tool Runtime
The Tool Runtime turns model tool calls into real actions.
For example:
read_file({ path: "README.md" })
search_text({ query: "ToolRegistry" })
git_diff()
apply_patch({ patch: "..." })
The tool system serves both the model and the program:
- The schema shown to the model must be clear.
- The handler used by the program must be reliable.
- Tool failures must return recoverable errors.
Agent Loop
The Agent Loop controls a multi-step task.
It handles:
- maximum step count
- tool call results
- whether the model has reached final output
- timeouts
- error recovery
- intermediate state recording
Without a loop, you only have a single model call. With a loop, the system starts to behave like an agent.
Safety Layer
The Safety Layer owns the permission boundary.
It decides:
- which paths can be read
- which paths can be written
- which commands can run directly
- which actions require user approval
- whether network access is allowed
The stronger a coding agent becomes, the more important the Safety Layer becomes.
Transcript
The Transcript is the execution log. It records what happened during a task:
- user input
- model response
- tool call
- tool result
- error
- latency
Without a transcript, agent failures are hard to debug. You only see the bad result, not why the system reached it.
How This Series Will Proceed
The first phase of this series is 14 days. The goal is not to build a complete Cursor clone. The goal is to build a CLI harness that explains the core mechanics.
By the end of this phase, the system should look like this:
User task
  -> CLI receives it
  -> Context Builder assembles context
  -> Agent Loop calls the model
  -> Tool Runtime reads files, searches, inspects diffs, applies patches
  -> Safety Layer asks for approval
  -> Transcript records the run
  -> final result and debug output are printed
The Day 14 acceptance target is:
- the agent can read files
- the agent can search code
- the agent can inspect git diff
- the agent can apply a patch after approval
- the key execution process can be recorded and debugged
Skills, MCP, IDE extensions, browser control, and subagents belong to the second phase.
Demo
Day 01 does not implement agent functionality yet, but the demo should still verify something real. Today’s demo checks three things: the article’s main structure exists, the layered architecture image exists, and the project architecture document corresponds to the article.
rg -n "^## (文章介绍|常见接口形态|模型、Agent 和 Harness 的边界|一个 Coding Agent Harness 需要什么)" articles/day-01-what-is-agent-harness.md
file assets/day-01/agent-harness-layers.png
sed -n '1,80p' docs/architecture.md
Current System Capability Change
Today completed the conceptual boundary, not a functional code feature.
We clarified:
- The model generates and decides.
- The agent is multi-step task behavior.
- The harness owns context, tools, permissions, state, and interaction.
- Much of the difference between Cursor/Codex-style products comes from the harness, not just the model.
Problems Encountered
The Day 01 problem was not an implementation bug. The hard part was keeping the boundaries clear.
There were three concrete tradeoffs:
- Do not explain model APIs as if they were agent products. OpenAI and Anthropic APIs provide chat, tool calling, and structured tool results, but file reads, command execution, and approval all happen inside the harness.
- Do not expand the scope to IDE/MCP/cloud tasks too early. Those are important product layers, but they obscure the core execution chain. The first phase uses a CLI to expose the essence.
- Do not write only concepts without a verifiable deliverable. The Day 01 demo does not fake functionality; it verifies that article structure, architecture document, and layered architecture image exist.
This tradeoff determines the implementation order: first get the CLI, tools, loop, logs, and safety boundary working; then extend into Skills, MCP, IDE extension, and subagents.
Tomorrow
Tomorrow is Day 02: Project Scaffold.
We will initialize TypeScript + npm workspaces, create apps/mini-harness and packages/shared, and make the following command run:
npm run dev -- "hello"
Comments